Tuesday 31 July 2012

Embellies with a Twist at TCC - Anything Goes

It is the end of the month and we have another "Anything Goes" theme for our Monday Embellies with a Twist challenge.  We would love for you to join us at The Crafter's Cafe and take part.

My card features the colours from The Play Date Cafe - Challenge #142


Here is the card:

IMG_2624

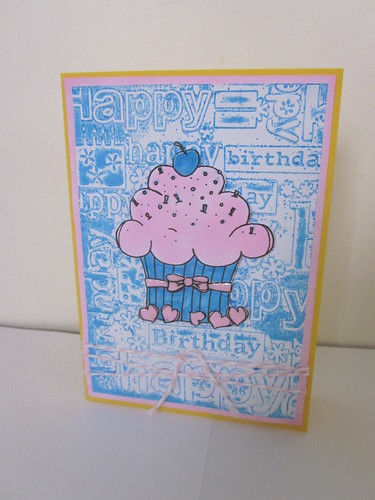
I coloured my image using the pink copic and a the celeste blue ink and cut it out.  I inked the inside of the happy birthday embossing folder with the celeste blue ink using a brayer, added the white card stock and put it through my cuttlebug.  I matted this onto the pink card (the edge coloured with my pink copic marker as I didn't have the right pink and that way it matched the pink on the cupcake).  I added my twine and then mounted this onto the yellow card.  I adhered the cupcake image using dimensionals and added some glossy accents on the cherry, ribbon and hearts to give a bit more dimension to the cupcake.
 
Supplies:
Image: The Stamping Boutique -  Cupcake digital image
Cardstock: Yellow and white
Ink: Celeste blue impress ink 
Other: Cuttlebug happy birthday folder, pink and white twine, glossy accents, Copics, RV02, Pen nibs,

It is also The Crafter's Cafe's 3rd birthday and on Saturday 11th August there will be a huge birthday celebration.


Hope to see you there.

Have a great week.

Angela

Sunday 29 July 2012

A smal box of fudge

Last week I  wanted to give a little something to someone I knew who was having a small operation.  I had made some fudge so thought I would make a little box to put a few pieces in.  I could have done a little more to the box, but I needed to make something quickly.

The box:
IMG_2605

I used the mini pizza box style for this box. I stamped a small flower stamp over the plain purple card stock. I made a little sleeve to go around it to keep it closed.  I didn't have purple ribbon so inked the white ribbon I had and just had to give it some time to dry before I put it onto the sleeve.  Perhaps a few gems would have added to it.  

This type of box is also great  to put some small cards and envelopes in to give to someone.

The contents inside: Four pieces of russian fudge

IMG_2606

Here is the recipe in case you would like to try and make it yourself.

Russian Fudge (From the Edmonds Cookbook - a famous New Zealand recipe book)

3 cups sugar
½ cup milk
½ cup sweetened condensed milk
125g butter
1/8 teaspoon salt
1 tablespoon golden syrup

Put sugar and milk into a saucepan.  Heat gently, stirring constantly until sugar dissolves. Add condensed milk, butter, salt and golden syrup.  Stir until butter has melted.  Bring to the boil and continue boiling to the soft ball stage, stirring occasionally to prevent burning.  Remove from heat.  Cool slightly.  Beat until thick.  Pour into a buttered tin.  Mark into squares.  Cut when cold.  Vanilla essence or chopped nuts may be added to the fudge before beating if desired. 

Soft ball stage – 114ÂșC – Drop a small amount of syrup into very cold water.  A soft ball forms that flattens on removal.

Thanks for dropping by.

Angela

Tuesday 24 July 2012

Embellies with a Twist at TCC - Christmas in July

I was a week ahead of myself in some ways, but a day behind in this week's post.  The card I made last week for the "Make it wet" theme was a Christmas card and the challenge for this week is "Christmas in July". So here is another Christmas card.  Please join us for the challenge. Remember that now is a great time to start building up your Christmas card supply.  The challenge has returned to the old forum layout which seems a bit easier to work with.  If you participate you can also earn points.  Click here to learn how you can earn points. 

Today's card is a small 3 1/2" x 3 1/2" card.  I thought this small sized card would be good to make for a set of cards which can fit into small pizza box, along with envelopes.

IMG_2608 Merry Christmas

I stamped my image onto white card stock and cut it to size.  I used pen nibs to colour in the leaves and berries with ink. I sponged the edges.  I mounted this onto patterned paper with dimensionals which I had matted onto Wisteria Wonder card.  I used a technique that Dawn T had taught me.  The Wisteria Wonder matted card is actually white card sponged with ink to create the coloured matted background, (I could have used wisteria wonder cardstock, but I wanted to keep the full sized piece of card for something else.)

Supplies:
Stamps: Easy Events from Stampin' Up
Ink: Lucky Limeade, Wisteria Wonder (from Stampin' Up), Fired brick distress ink

Cardstock: White
Patterned Paper: DSP In colours 2011-2013
Other: Glossy Accents, Ranger brush tip pen nibs

Thanks for dropping by and for your comments.

Have a great rest of the week.

Blessings,
Angela

Tuesday 17 July 2012

Embellies with a Twist at TCC - Make it Wet!

Our Monday challenge Embellies with a Twist is "Make it Wet" - Rain, pool snow etc.

This was a challenge for me at first as a lot of my stamps relate to flowers, butterflies - spring and summer etc.  I do have some stamps and embossing folders with snow, so I decided to go for a card with snow and create a Christmas card.

IMG_2590 Snow Christmas card

Here is my creation.  I have gone for the textured "snowflakes" in the background.   Usually I would matt the sentiment banner onto blue card rather than adhere it straight onto the white, but I thought this may be okay against the textured background.  I would appreciate your comments on which you think would be better.

Supplies:
Stamps: The Crafts Meow, Sentiment - Hero Arts Seasons of Joy
Embellishments: Twine, pearls,
Other: Sizzix snowflakes embossing folder, silver embossing powder, Versamark ink, dimensionals
Card Stock: Royal blue and white 

Thanks for dropping by and for your comments.

Angela

Monday 9 July 2012

90 Minute Scramble

In case you are wondering, there is no post this week for The Crafter's Cafe - Embellies with a Twist.  Some changes are being made to the forum, so last week's challenge is being extended for another week.  So you still have a chance to take part in our "red, white and blue" challenge.

On Sunday morning at 7am (New Zealand time) I was able to take part in another Hero Arts Flickr Group 90 minute scramble. Something I haven't been able to do for a few weeks.  It was hosted by Ger (Cards n Chocs) from Ireland.  Her challenge was "Encouragement" with an optional challenge of masking. Masking is something I hardly do, so I thought I would give that a try.  You can see Ger's wonderful inspirational card, and the other cards that were created here.

Here is my first card.
Get well

I cut a spell binder label and masked off the centre of my card and then stamped with the Hero Arts envelope stamp, and sponged around the edge of the masked off area.  I stamped the branch stamp in the middle with Shabby Shutters distress ink.  I added my sentiment in the same colour ink, but it was hardly readable so I had to restamp it in brown onto another piece of card and add it with dimensionals.  I matted my image onto brown card.


Here is my second card. 

 Get Well Soon
This time I masked the top and bottom of the card and inked the middle part with wild honey distress ink.  I tried stamping the envelope stamp over this, but it hardly came out.  You may be able to just see it in parts.  I then stamped the Hero Arts Flowers and Get Well Soon sentiment in black versafine ink.  I matted it onto a similar colour in the background.    I wondered about doing something with the centre of the flowers, but I didn't know what and I was running out of time so lastly I added the twine as I feel it needed something else.

Thanks so much for dropping by and for your comments.

Have a great week.

Blessings,
Angela

Wednesday 4 July 2012

Embellies with a Twist at TCC - Red, white and blue

This post is a few days late.  It has been busy with the school holidays and so I wasn't able to make the card in time or post it on Monday.  So here it is now.  Better late than never.

The colours of the card - red, white and blue are inspired by the Embellies with a Twist challenge at The Crafter's Cafe.  We would love to have you join us and take part in our challenges. 

I decided to use the sketch at Card Patterns #172 for my design.  Unfortunately this is the last sketch for Card Patterns.  Due to family commitments and things, the blog is coming to an end.  This is the third blog I have enjoyed following and taking part in their challenges that is coming to a close.  A few months ago there was Wee Memories and then more recently, Lily Pad Cards.  I can imagine that a lot of time and effort goes into these challenges blogs (probably more than most of us realise) and I can appreciate that sometimes a good thing has to end and other priorities like family, need to come first. I know that even I struggle to get to my blog sometimes and that wouldn't be as much work as running a challenge blog.  So thank you for all of you who run the challenge blogs.


IMG_2502 tulips

I am also entering this in the Casual Friday challenge CFC59 - Round and round - Use 2 circles.

Supplies:

Image: Tulips digital stamp from The Stamping Boutique
Stamps: HA Happy Birthday
Patterned Paper: Cre8tiv
Other: Copics, Red and white twine, Small heart punch from Stamping Up,

Tonight was a special night.   We had a formal evening at our church, City Impact Church, celebrating its 30th birthday - today!  A very special occasion.  I have been at the church for 20 of those years.  I have seen a lot of changes and growth.  I have been blessed in so many ways by the church, including meeting my husband there.  Click here if you are interested in seeing a video about the 30 years of City Impact Church.


Thanks for dropping by and for your comments.  Enjoy the rest of your week.

Angela