Showing posts with label flower. Show all posts

Sunday, 29 July 2012

A smal box of fudge

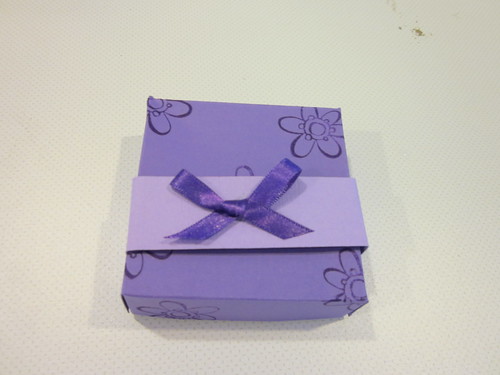
Last week I  wanted to give a little something to someone I knew who was having a small operation.  I had made some fudge so thought I would make a little box to put a few pieces in.  I could have done a little more to the box, but I needed to make something quickly.

The box:
IMG_2605

I used the mini pizza box style for this box. I stamped a small flower stamp over the plain purple card stock. I made a little sleeve to go around it to keep it closed.  I didn't have purple ribbon so inked the white ribbon I had and just had to give it some time to dry before I put it onto the sleeve.  Perhaps a few gems would have added to it.  

This type of box is also great  to put some small cards and envelopes in to give to someone.

The contents inside: Four pieces of russian fudge

IMG_2606

Here is the recipe in case you would like to try and make it yourself.

Russian Fudge (From the Edmonds Cookbook - a famous New Zealand recipe book)

3 cups sugar
½ cup milk
½ cup sweetened condensed milk
125g butter
1/8 teaspoon salt
1 tablespoon golden syrup

Put sugar and milk into a saucepan.  Heat gently, stirring constantly until sugar dissolves. Add condensed milk, butter, salt and golden syrup.  Stir until butter has melted.  Bring to the boil and continue boiling to the soft ball stage, stirring occasionally to prevent burning.  Remove from heat.  Cool slightly.  Beat until thick.  Pour into a buttered tin.  Mark into squares.  Cut when cold.  Vanilla essence or chopped nuts may be added to the fudge before beating if desired. 

Soft ball stage – 114ÂșC – Drop a small amount of syrup into very cold water.  A soft ball forms that flattens on removal.

Thanks for dropping by.

Angela
Monday, 5 March 2012

My first attempt at the Velveteen stamping technique

Today's card is for the Hero Arts March challenge.  It has flowers on it and I also wanted to make a card using the Velveteen stamping technique.  I had watched Shari Carroll's video a couple of days ago and I was trying the technique from memory.  It wasn't until after I made it, I realised that I didn't quite follow her instructions properly.  


Pink, yellow and orange flowers

I white embossed the Old French writing image first (instead of just stamping it with white pigment ink),  Then I stamped the flowers on top of this. (I will have to make another card and try the technique again.)  I mounted the stamped image onto hot pink card.  I added the twine and the sentiment also edged in the hot pink card.  I added some butterflies punched from the hot pink card that I had dry embossed with the D'vine swirl cuttlebug folder.  I sponged the edge of my white card with the pink ink and mounted the stamped image onto this.   Lastly I added kindy glitz to the centre of the flowers.
This card is larger than what I usually make as I need a bigger card so there is enough for many people to write their birthday greetings. It is approximately 6" x 8".


This is also for the Simon Says Stamp - Anything Goes Challenge
Supplies:
Ink: Archival Brilliance Aurora (three colours - yellow, orange and pink), Embossing ink


Stamps: Hero Arts 4 flowers (CQ290), Hero Arts Happy Birthday, Old French Writing (H2365),


Other: white embossing powder, kindy glitz, twine, butterfly punch, D'vine swirl cuttlebug folder


Cardstock: Hot pink and white


Thanks for stopping by and for your comments.


Have a great week.


Angela